
Dial-up Networking for Windows 95/98
Dial-up Networking for Windows 95/98
![]() Configuring
Dial-up Networking
Configuring
Dial-up Networking
If you would rather see a movie of this,  click here.
To start Dial-up Networking, click on the icon in
the Accessories group (Start Programs Accessories
Dial-Up Networking). The 'Make New Connection' Wizard should
appear. If it does not, double click on the 'Make New Connection'
icon to start the program. The image below is the first window
of the 'Make New Connection' Wizard:
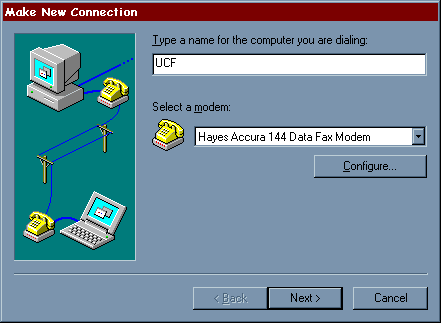
In the box underneath 'Type a name for the computer
you are dialing:' enter UCF. The modem section should already
have your modem listed in it. Note: If your modem has not
been setup up already the 'Install Modem Wizard' will start automatically
and set up your modem. Click on the 'Next' button and the following window should appear:
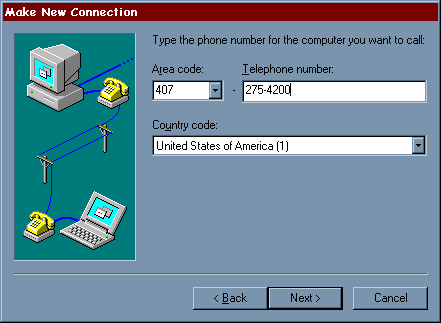
In the 'Telephone number' area type one of the following numbers
|
Main Campus (ten digit dialing is in effect) |
students: (407) 235-4201 faculty and staff: (407) 235-4220 |
|---|---|
|
Brevard Campus (ten digit dialing is in effect) |
|
|
|
|
Note: If you are dialing from on campus, you will need
to add a '7,' to the beginning of the phone number to dial
in. Click on the 'Next>' button to continue. The next box tells
you that your connection is finished. Click on the 'Finish' button
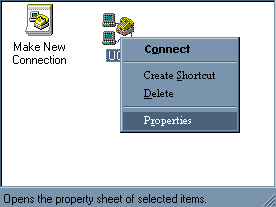
to exit out of the Wizard. You should now see a window called
'Dial-Up Networking' with two images in it. Right click on the
'UCF' icon and then click on 'Properties' as shown in the following
image:
This should bring up a properties window as shown
below:
NOTE: If you have a newer
version of Windows 95/98, you may see a different window than from
what is shown in this handbook. However, the configuration process
will still be the same. If you have difficulty, please call the Help Desk (823-5117) for assistance.

First click on the "Configure' button, and then click on the 'Options' tab. The following window should appear:
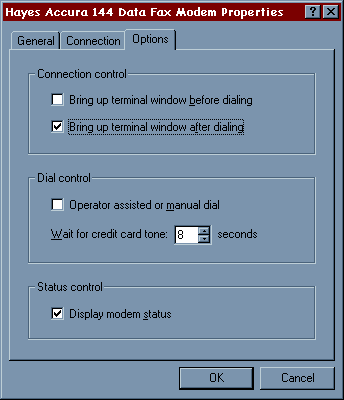
In this area click on the 'Bring up terminal after dialing' check box. Click on the 'OK' button. This will return you to the original Wizard screen.
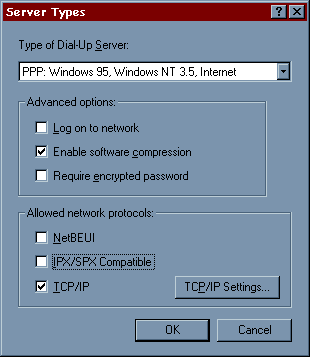
Click on the 'Server Type' button. This will bring
up another window. In this window make sure that the 'Log on to
network' option is not checked. If this option is check, click
on the check mark area to deselect it. If this option is checked
you will have problems connecting later. In the section labeled
'Allowed Network Protocols' make sure that only TCP/IP is selected.
The windows should look like the following:
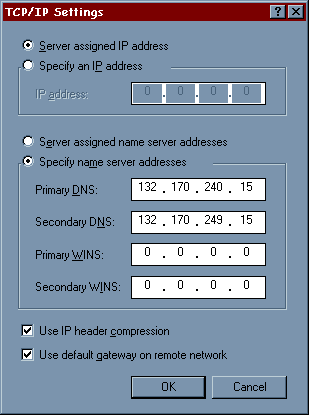
Press the 'TCP/IP Setting button. This brings up another window. In this section, make sure that 'Server assigned IP address' is selected. Click on 'Specify name server addresses' and then put the following information into the fields:
Primary DNS: 132.170.240.15
Secondary DNS: 132.170.249.15
Make sure that the option for default gateway is
enabled. When you are finished the window should look like the
following:
Click the 'OK' button to exit out of the 'TCP/IP
Settings' area, click the 'OK' button to exit out of the 'Server
Settings' area, and click the 'OK' button to exit the properties
of this connection.

![]() Connecting
to the Terminal Server
Connecting
to the Terminal Server
To dial into the system, double click the 'UCF' icon in the 'Dial-Up Networking' window. This will bring up a dialing window. Click the 'Connect' button to call the terminal server. The modem will dial, and after the modem connects, a terminal window will appear, with a prompt asking for your 'Username:'. Enter in your login id for Pegasus and press <ENTER>. The next prompt will ask you for your 'Password:'. Enter in your password for your Pegasus account and press <ENTER>. At this point you will see a prompt similar to as5100-xx>. Type in 'ppp' and press <ENTER>.
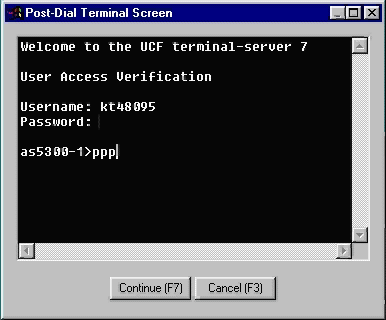
You will then see something similar to the following messages:
Entering PPP mode.
Async interface address is unnumbered (Ethernet0)
Your IP address is 132.170.nnn.nnn. MTU is 1500 bytes
At this point click the 'Continue' button
on the terminal window (or press F7). The system will then tell
you that you are connected to the system, and the speed that you
are connected at.
Now that your connection is established you can open your TCP/IP applications, such as Internet Explorer or Netscape.
If you wish to log on to Pegasus, click on Start, then Run. When the window opens, type the following:
telnet pegasus.cc.ucf.edu
Then click on the 'OK' button. After a few seconds, a login prompt will appear where you can type your pegasus login name. For more information on using Pegasus Pine, see the E-mail Basics section of this CD-ROM.


